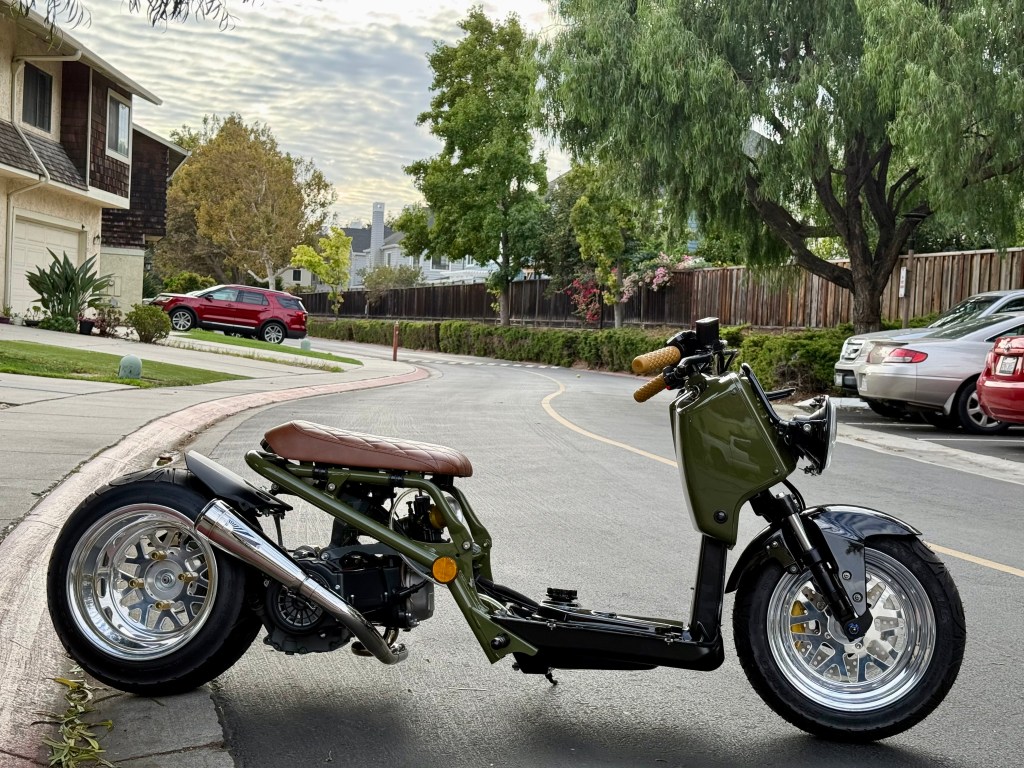
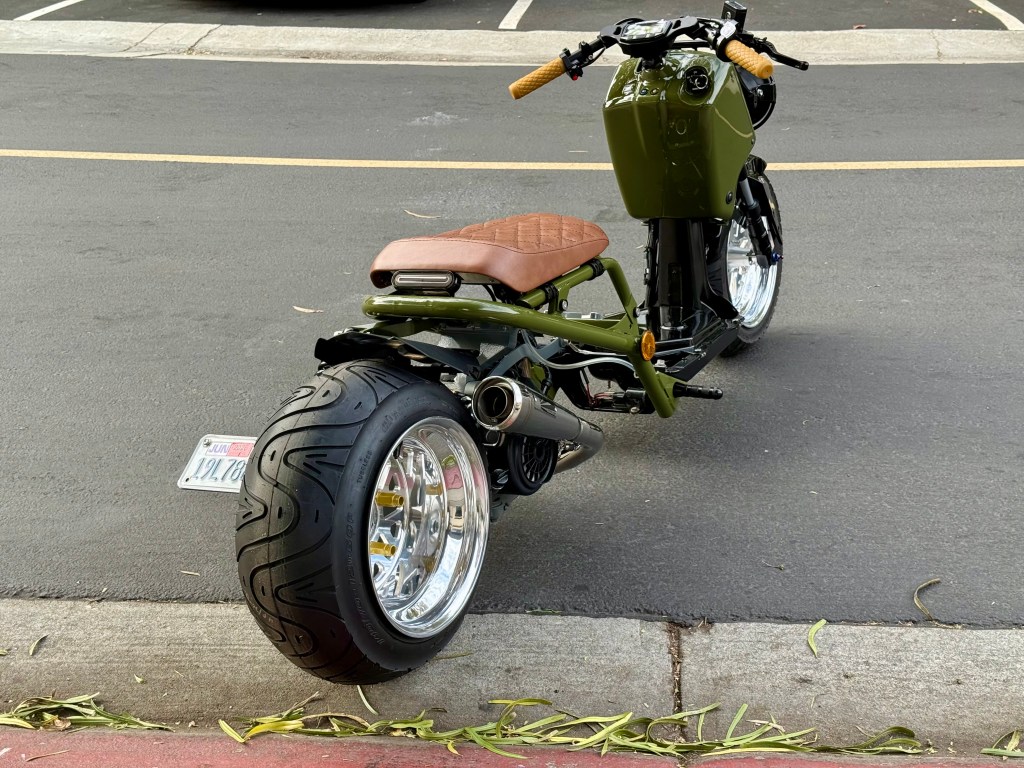
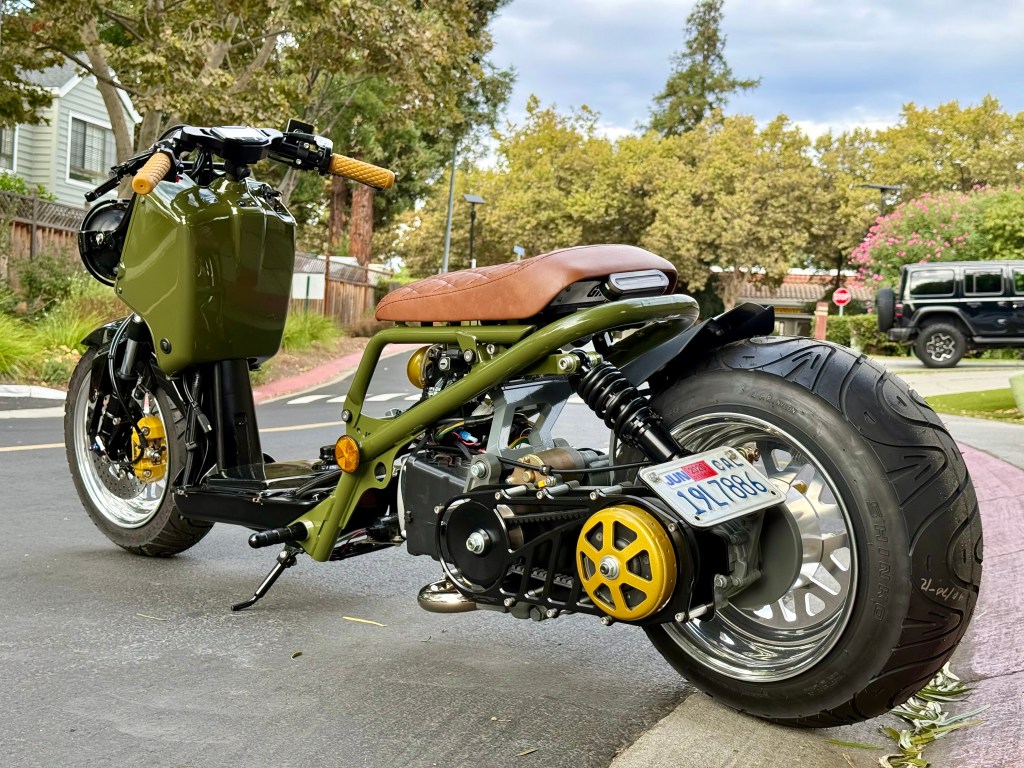
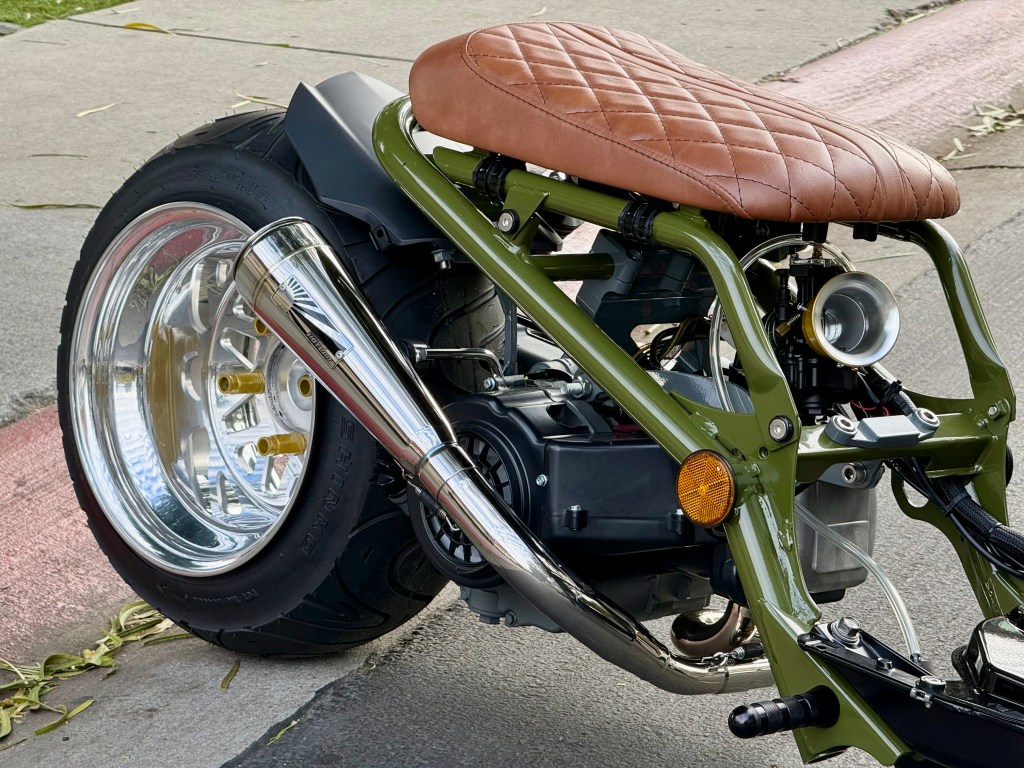
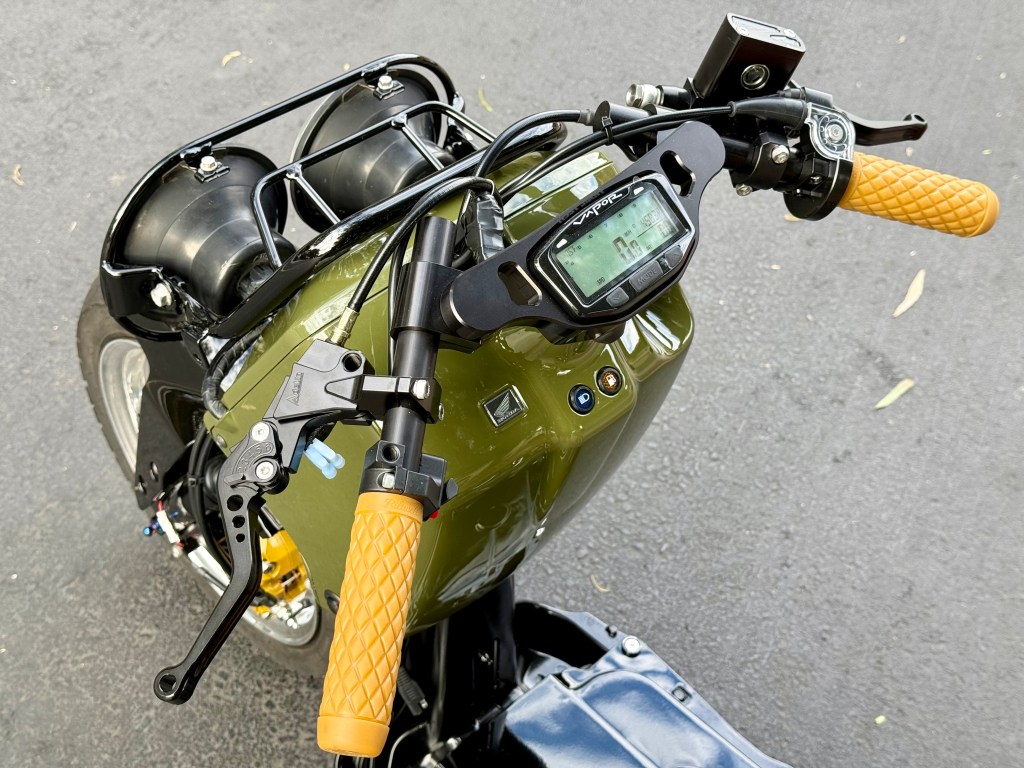
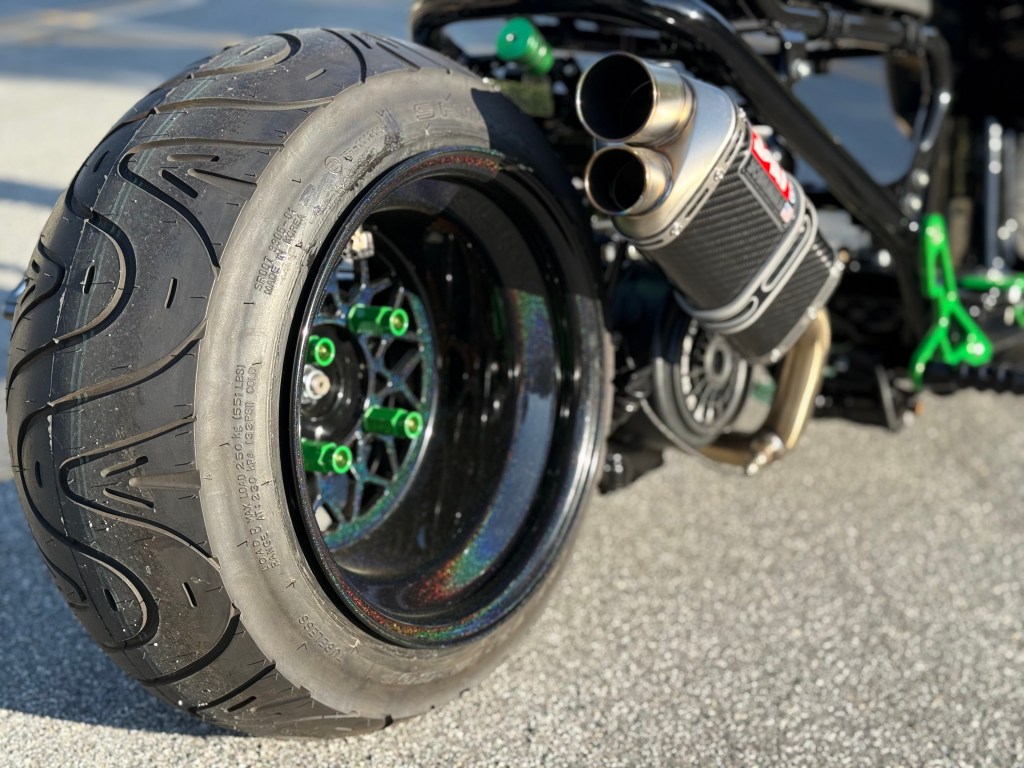
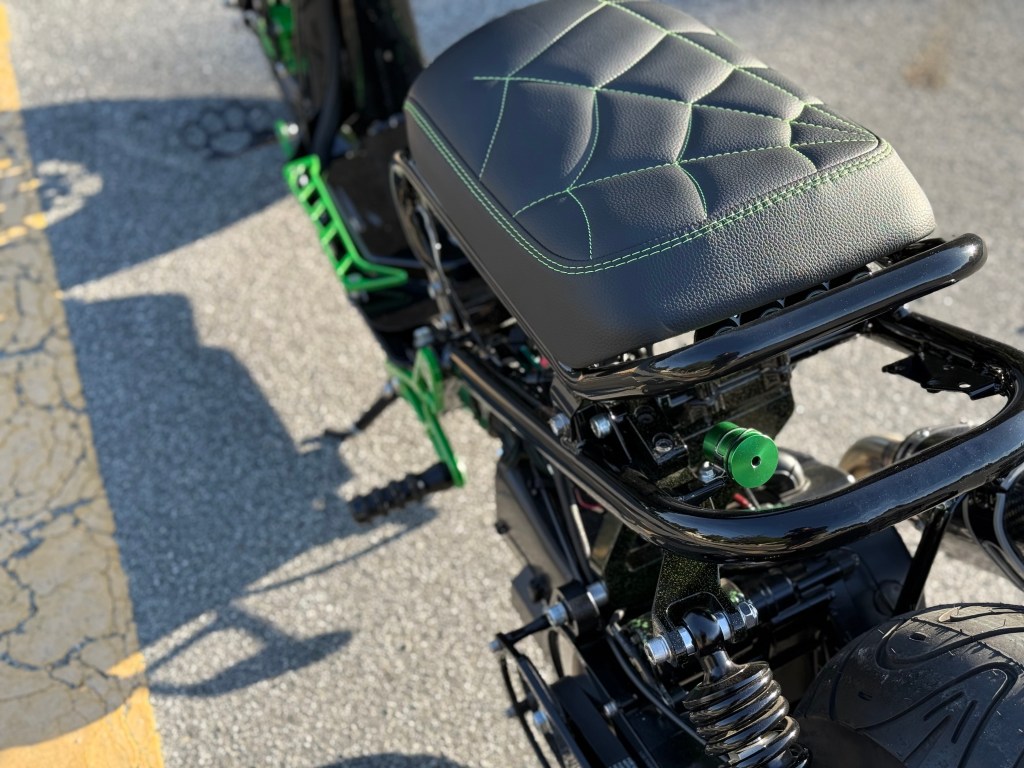
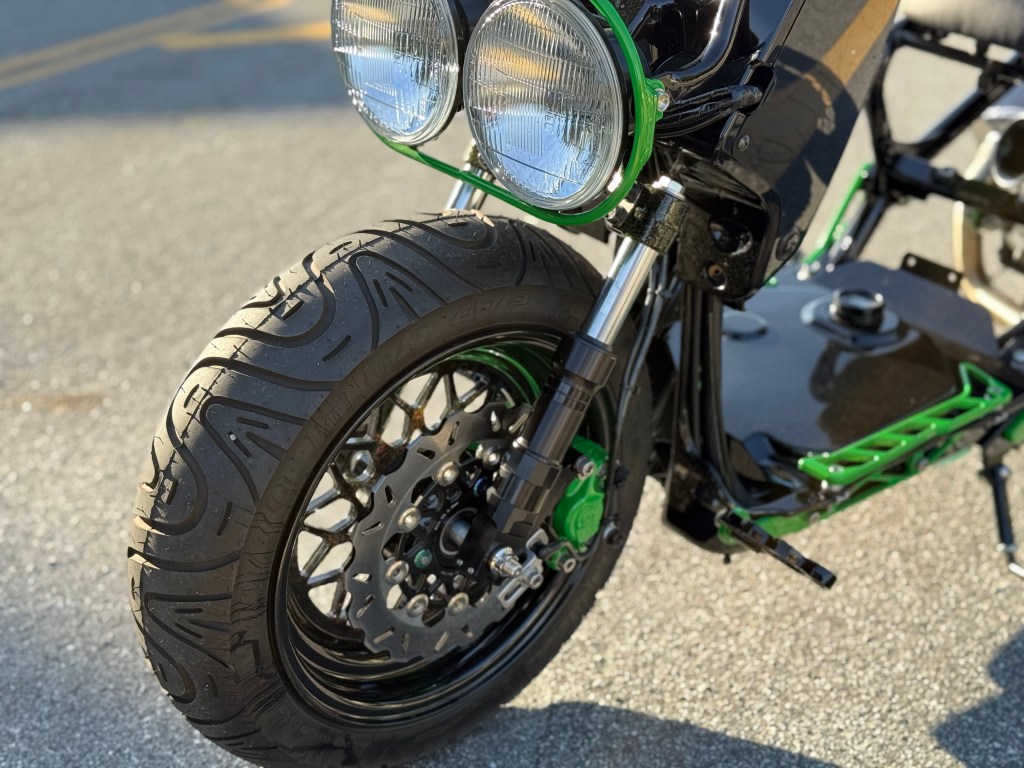
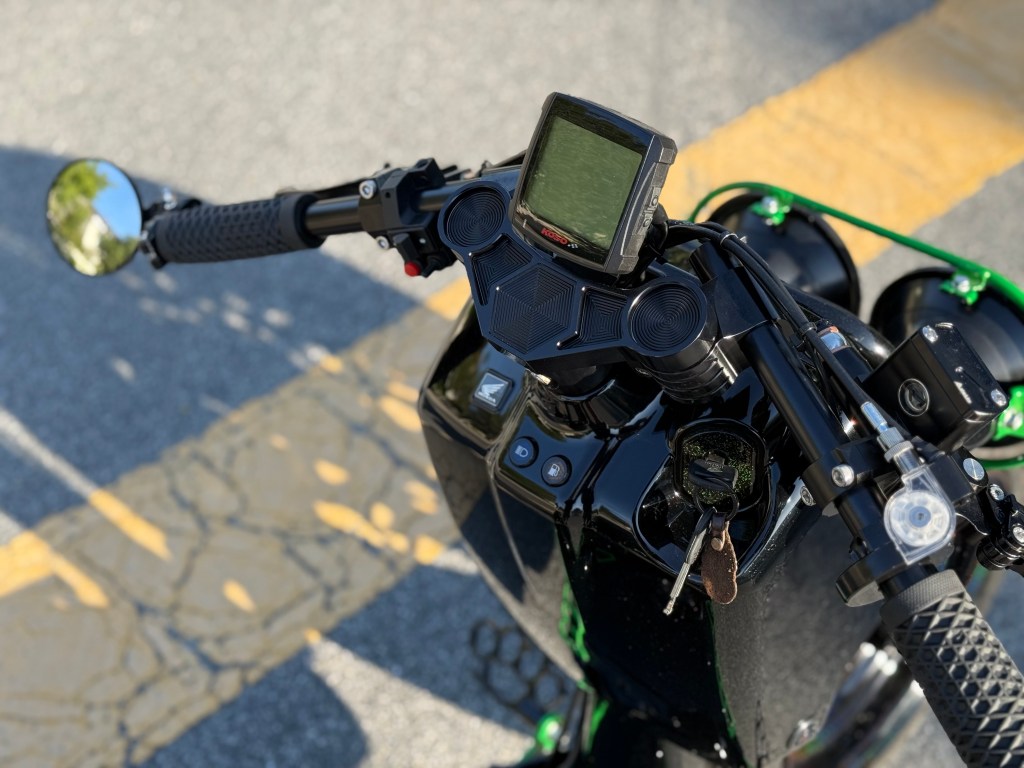
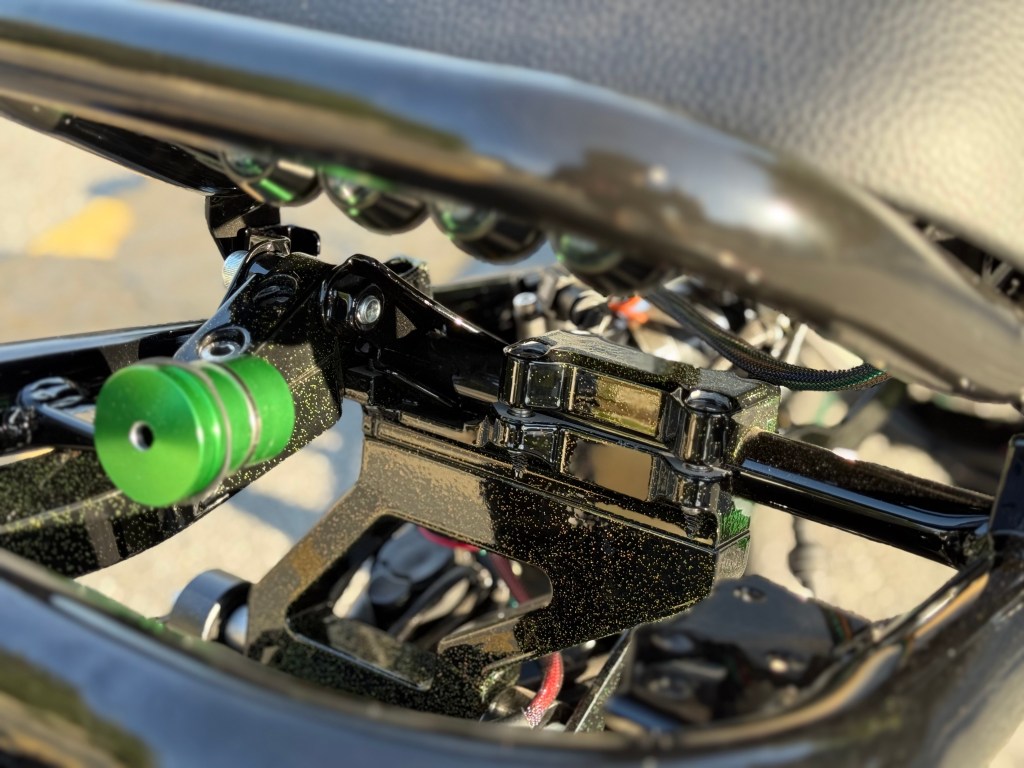
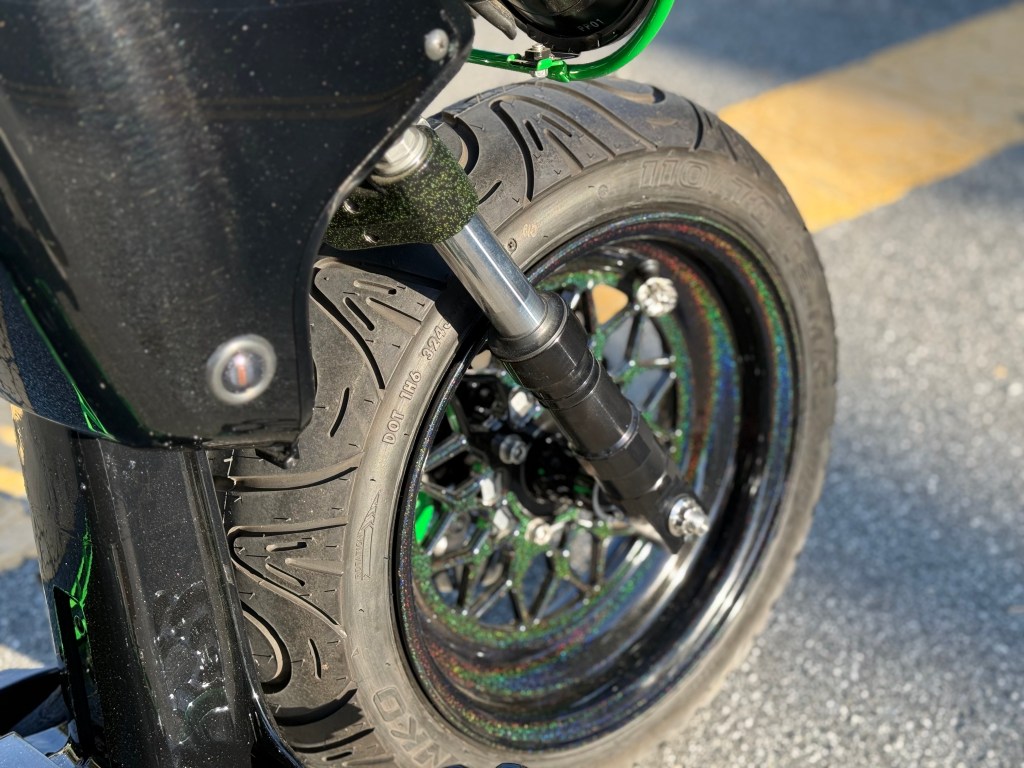
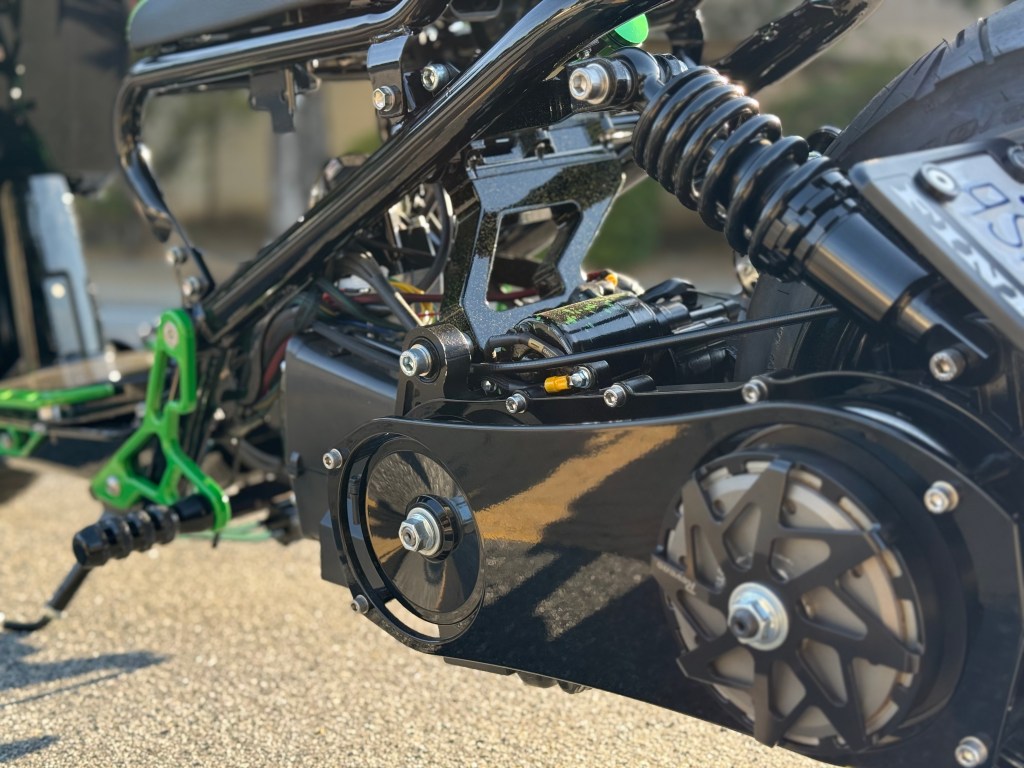
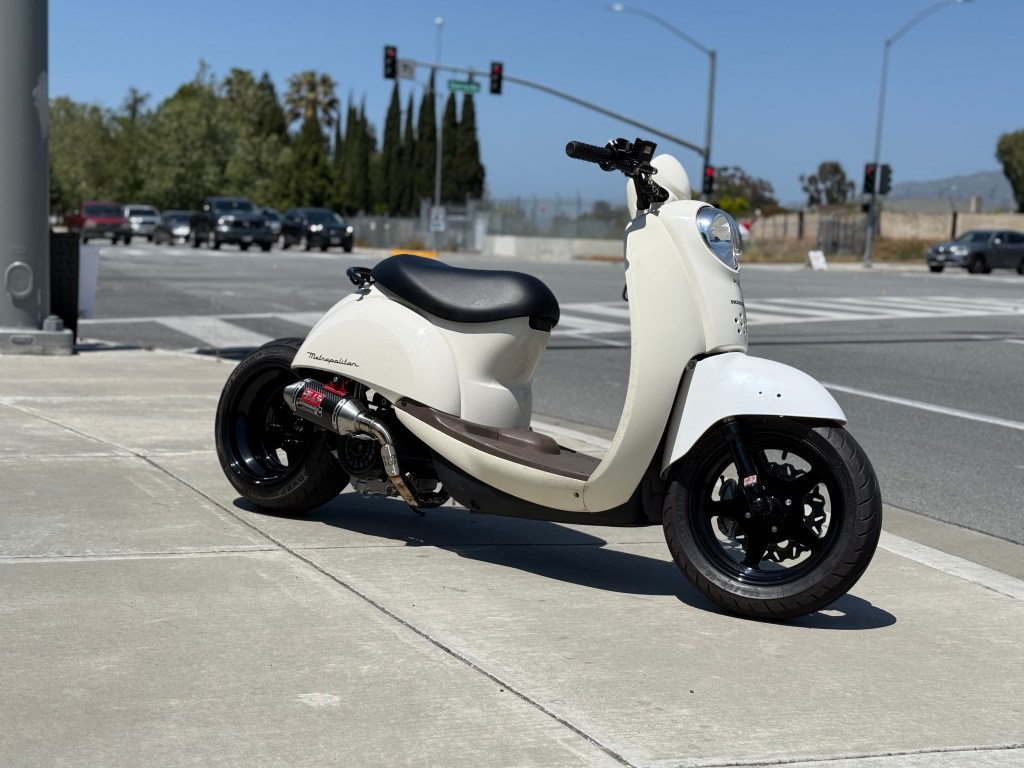
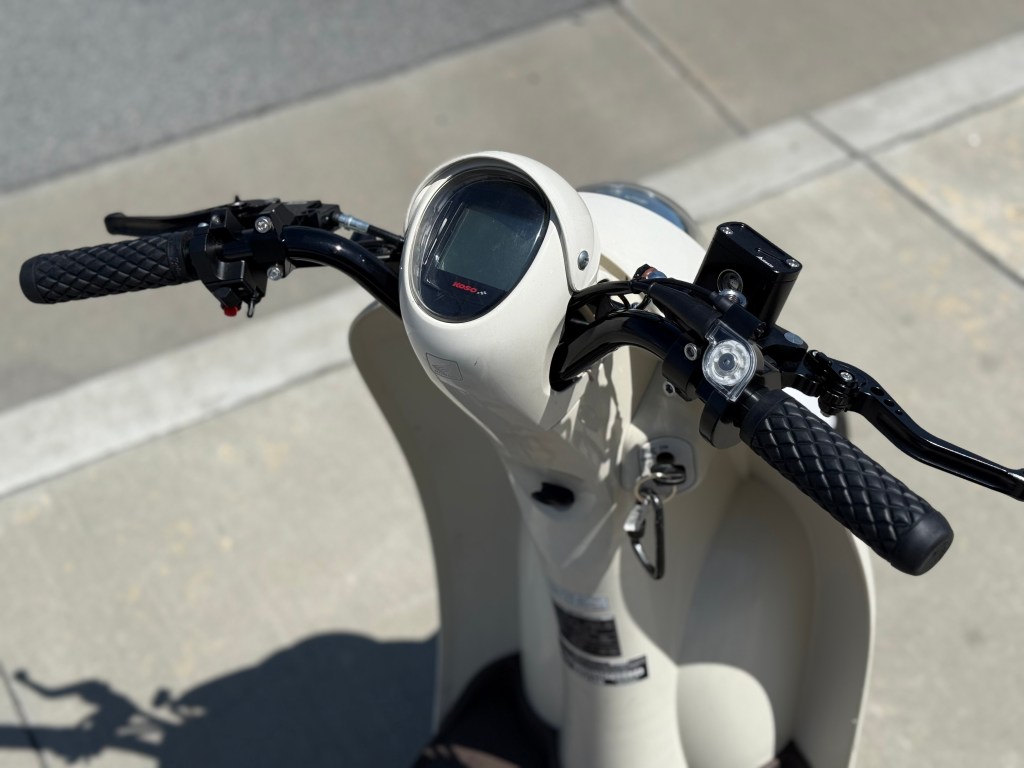
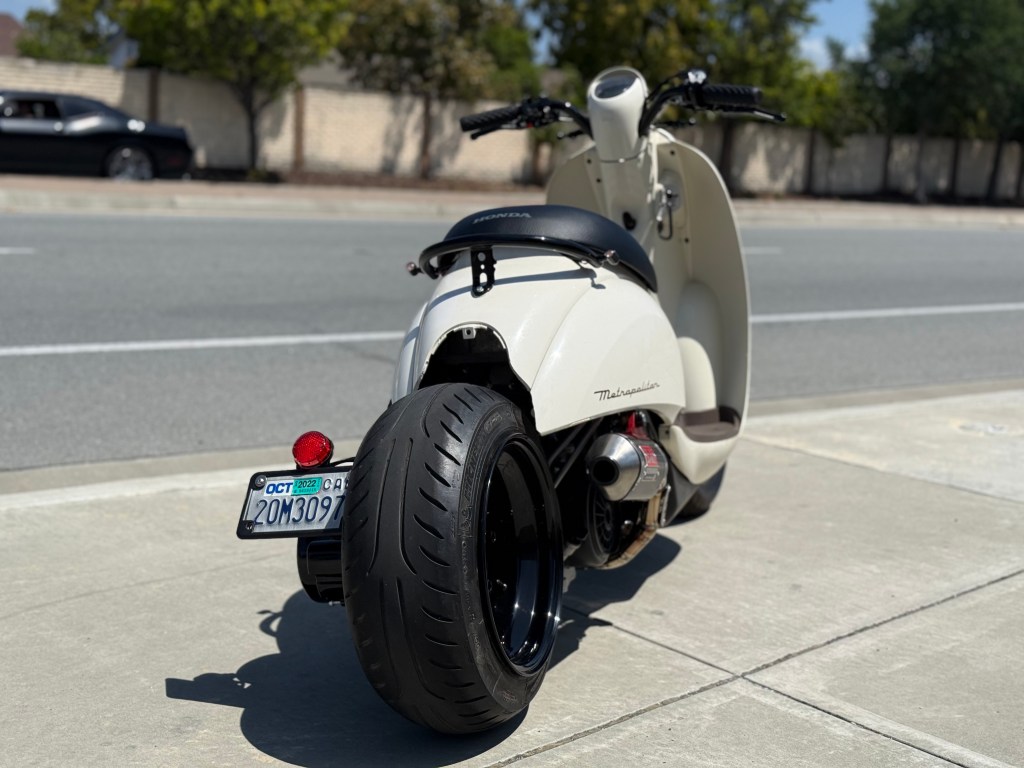
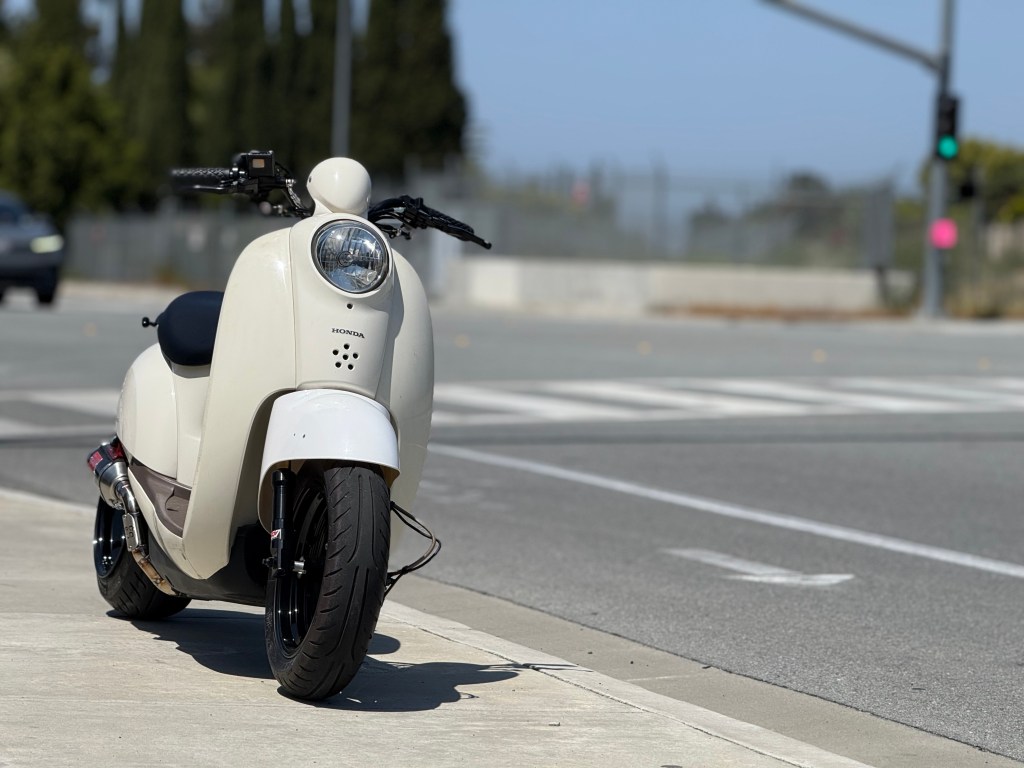
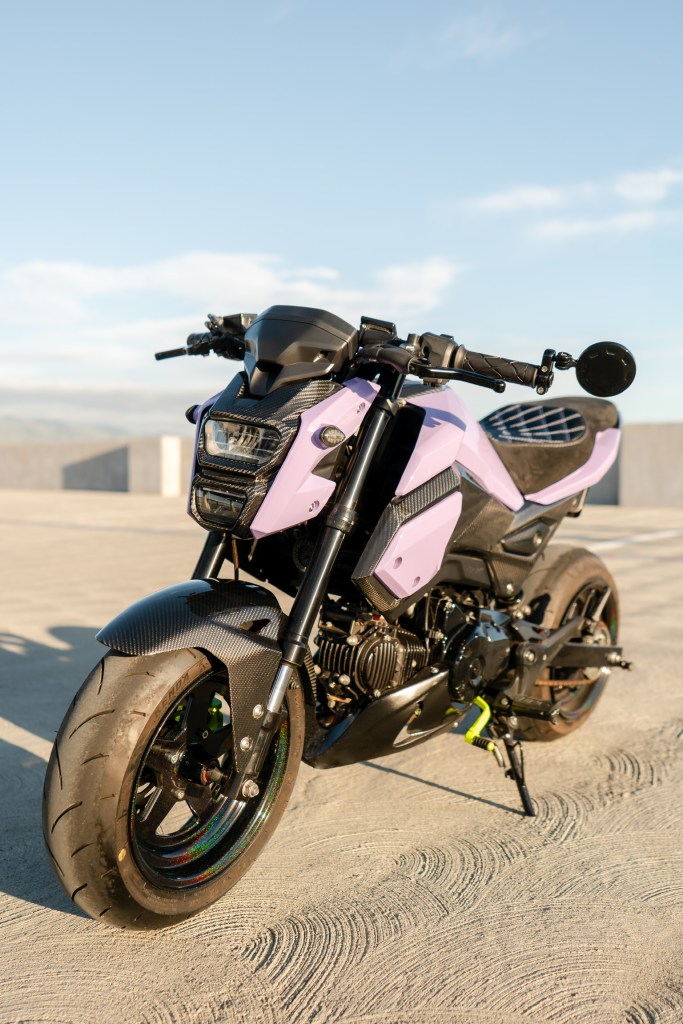
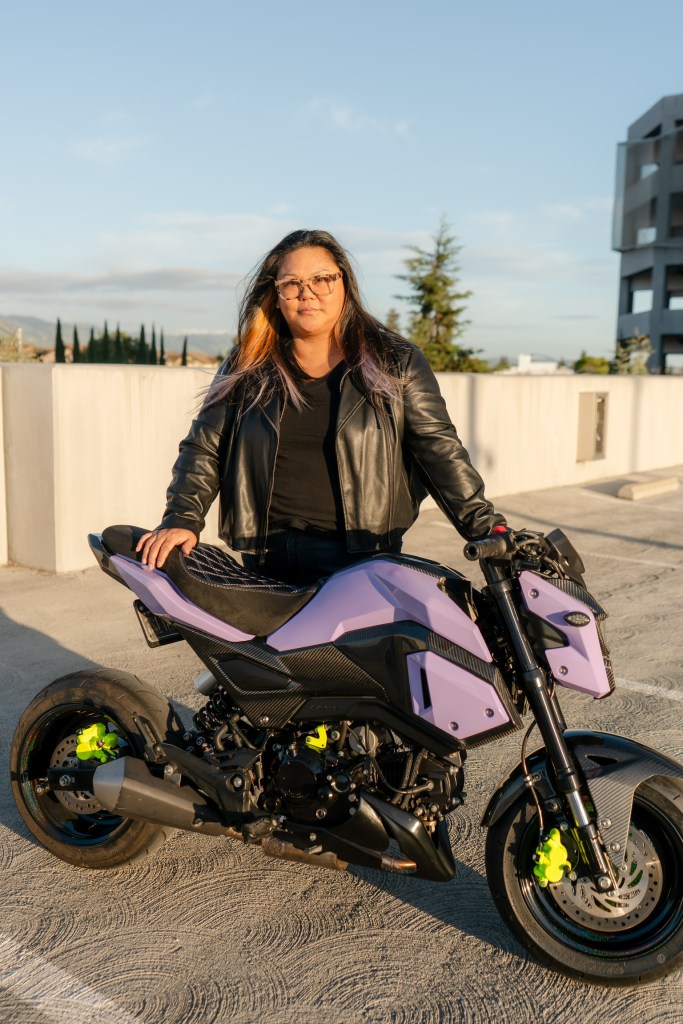
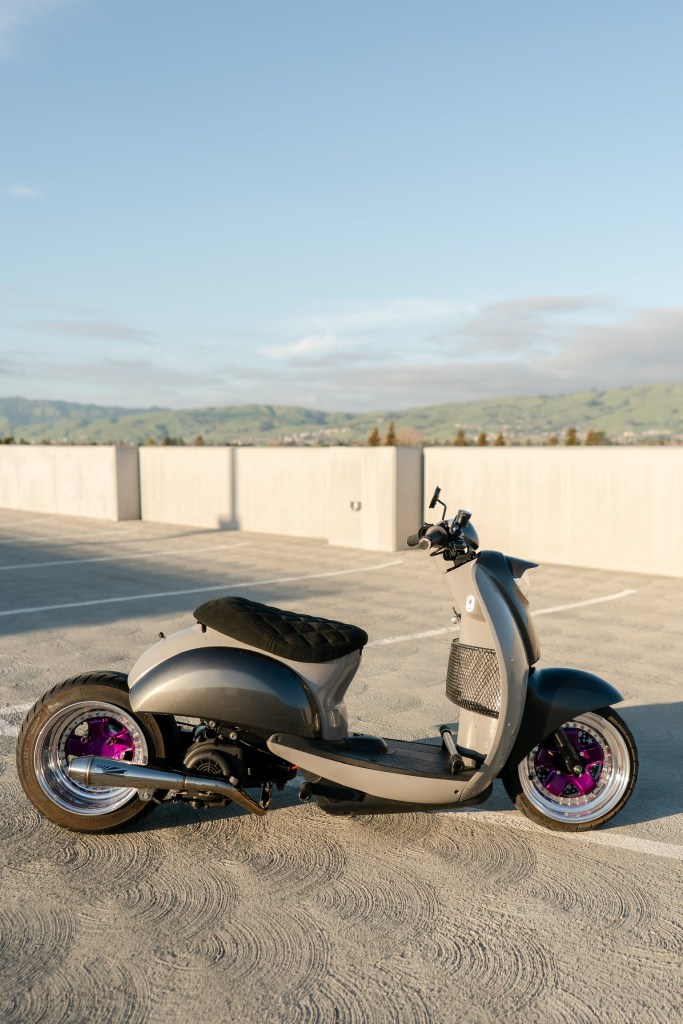
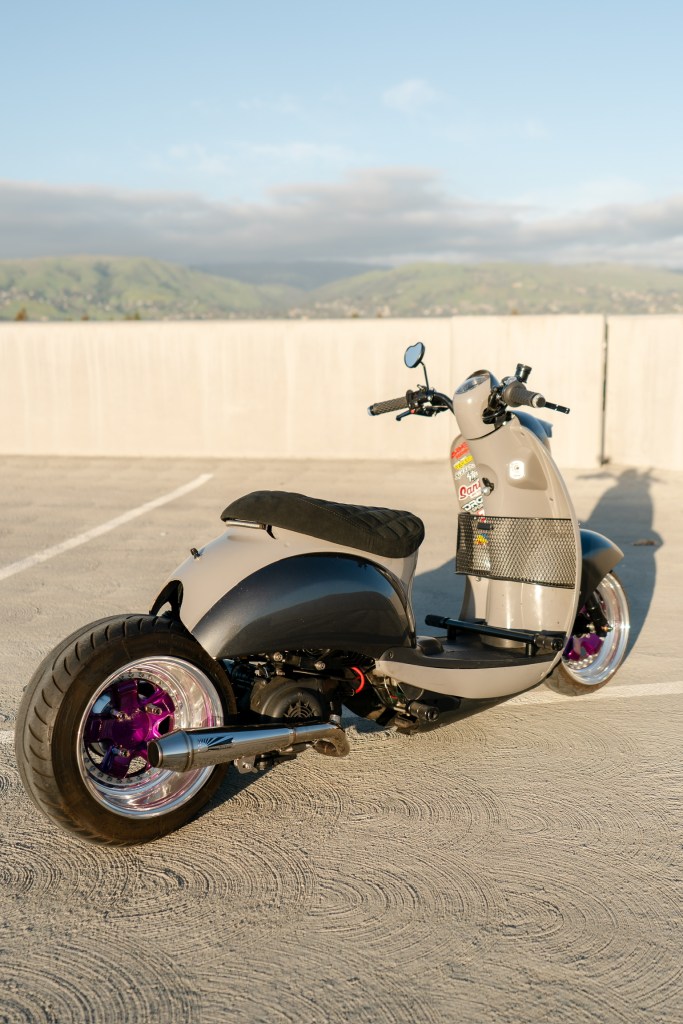
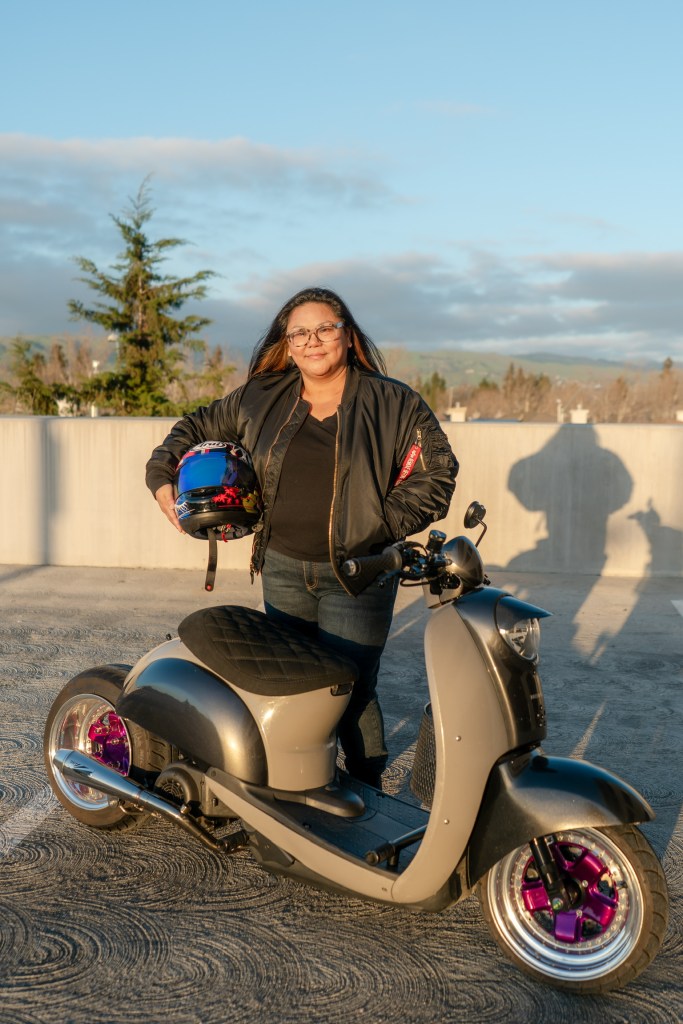
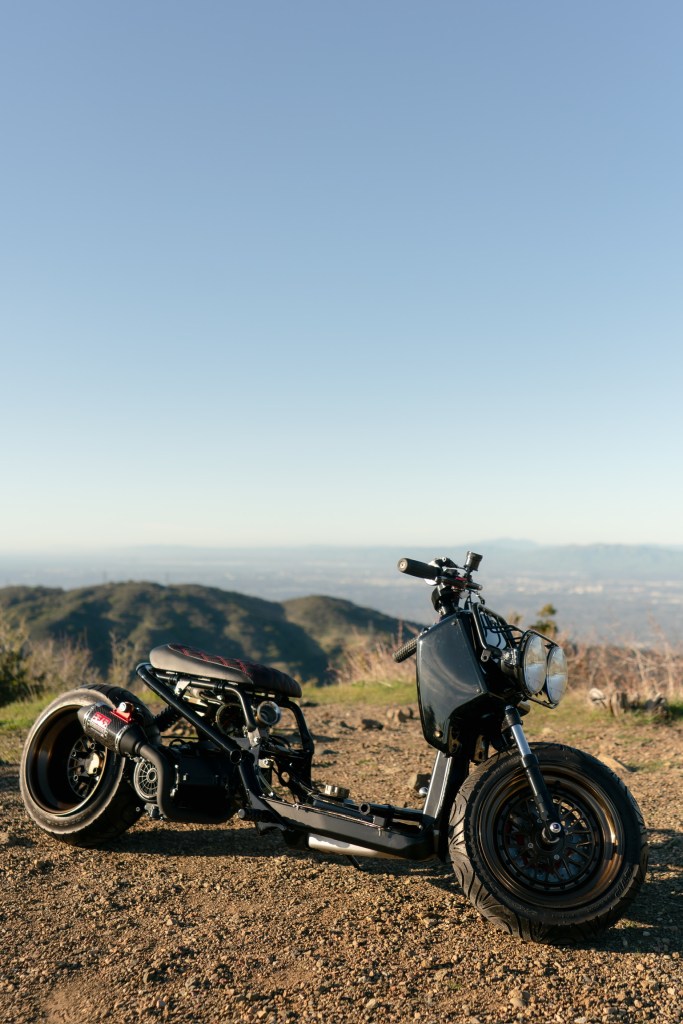
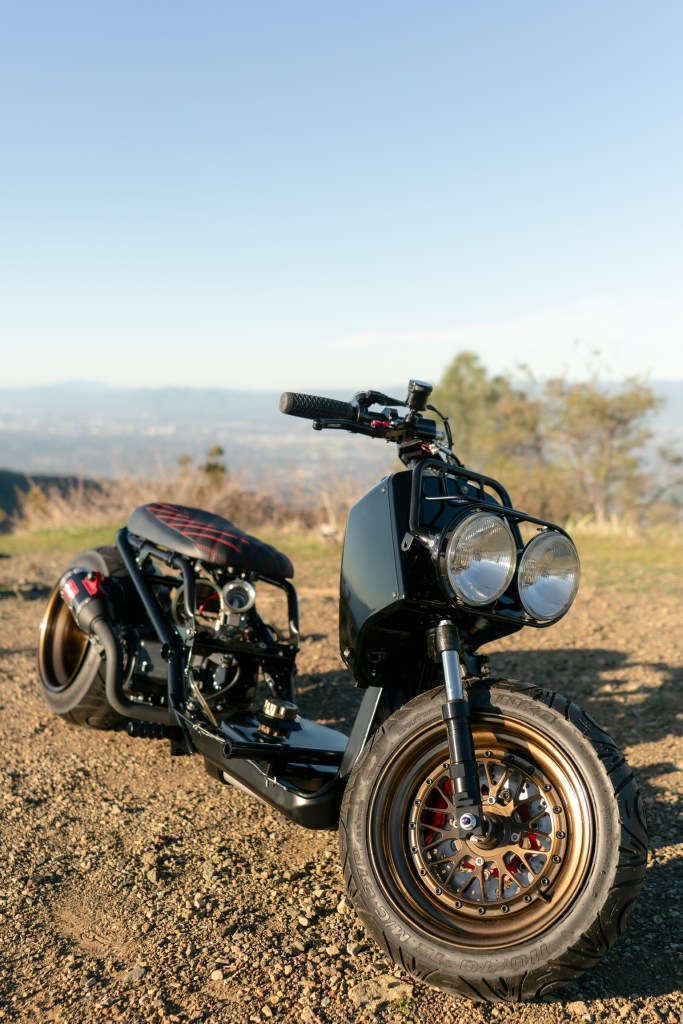
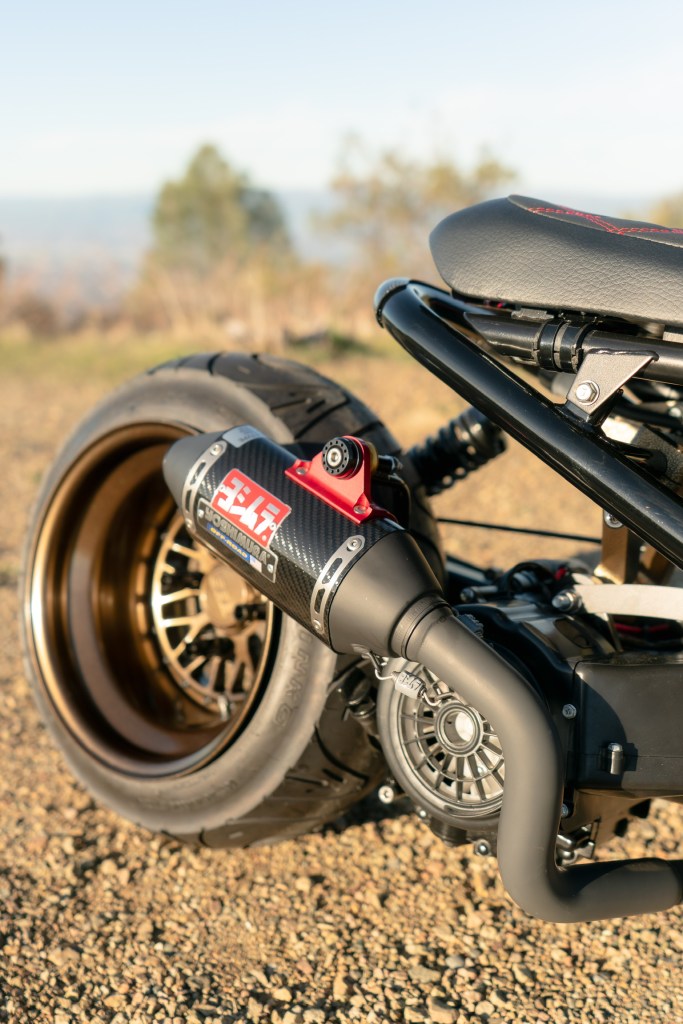
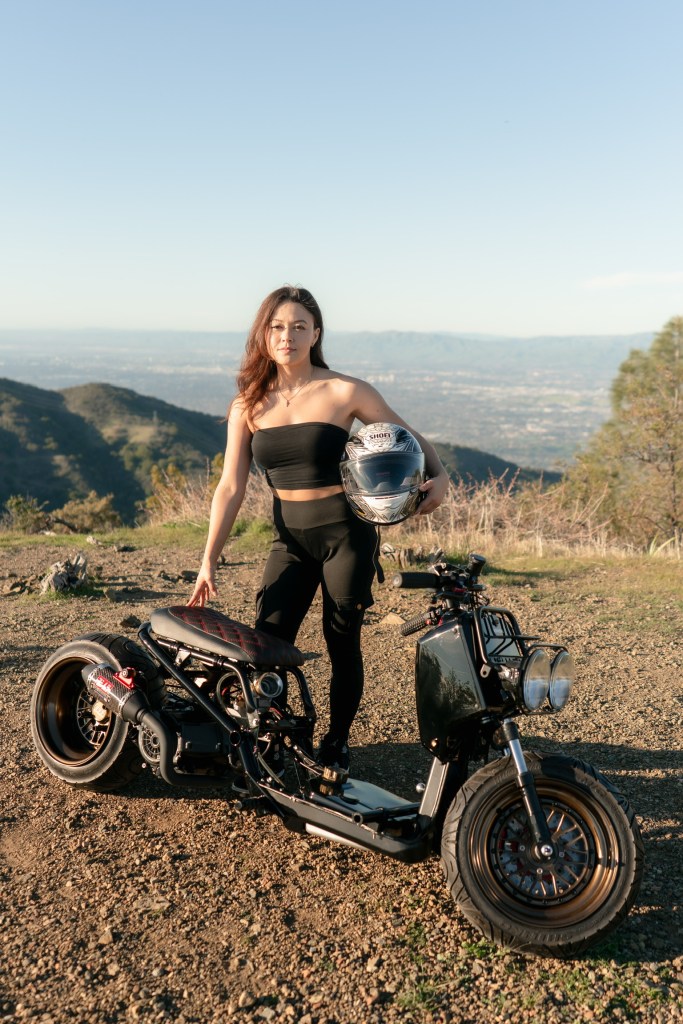
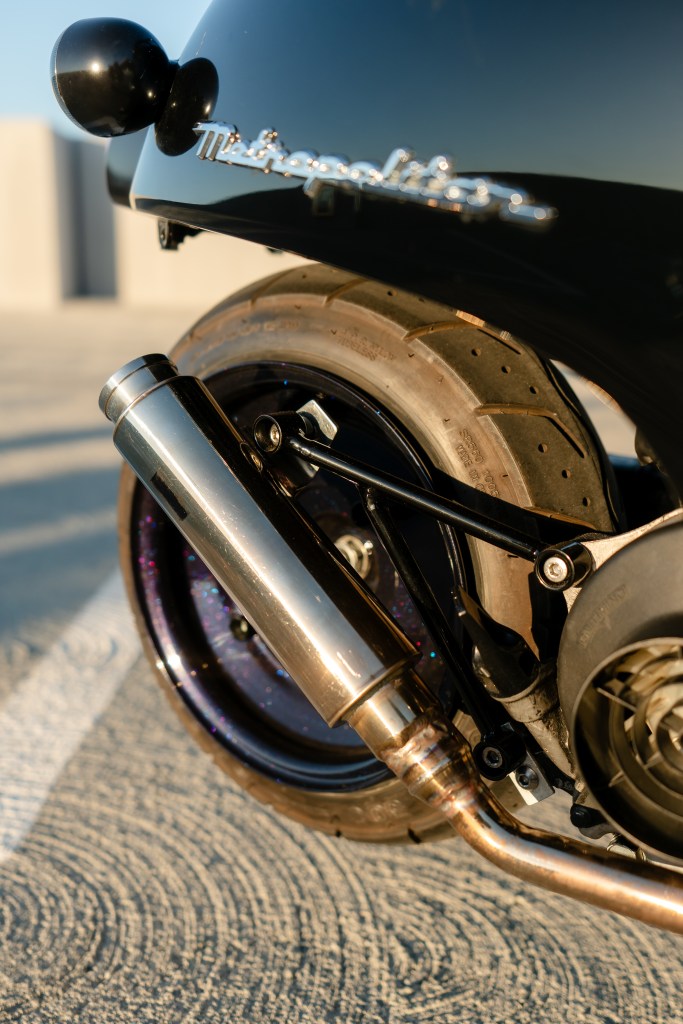
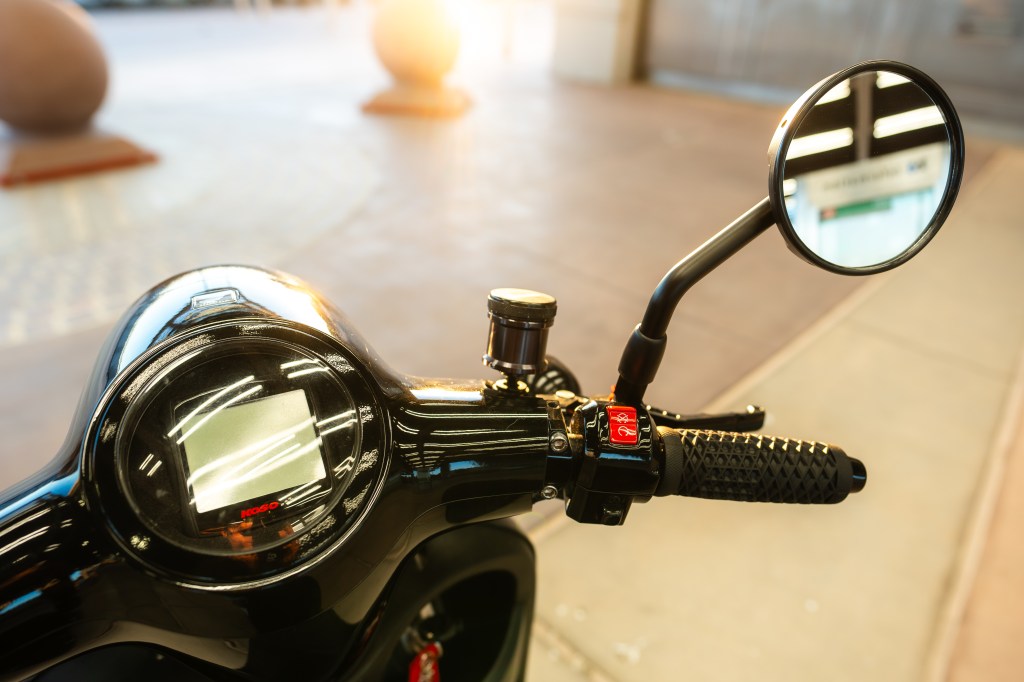
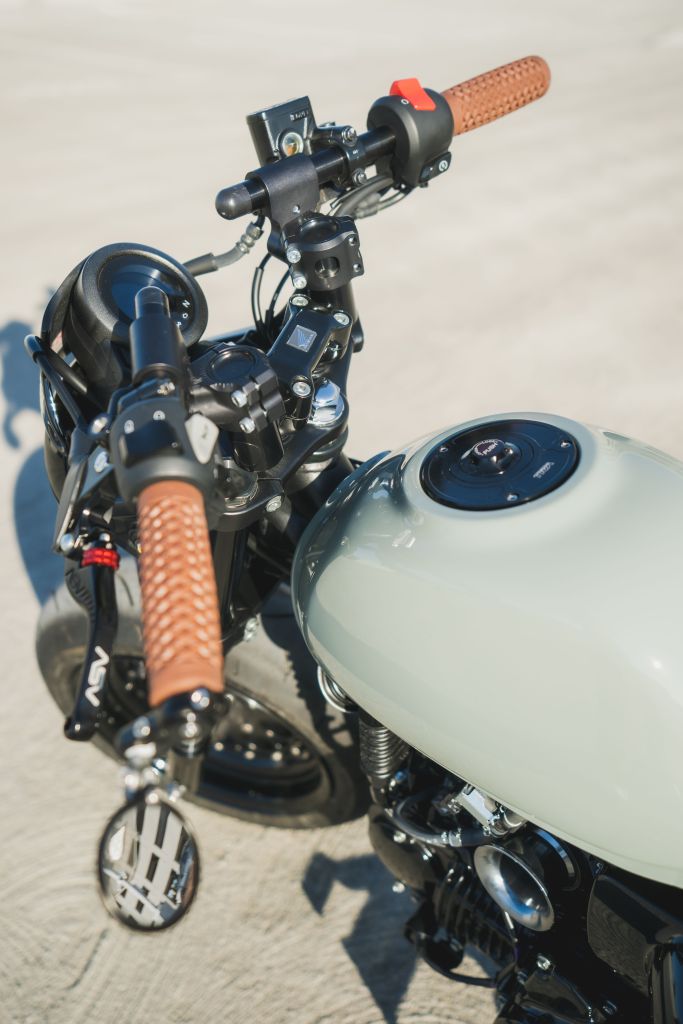
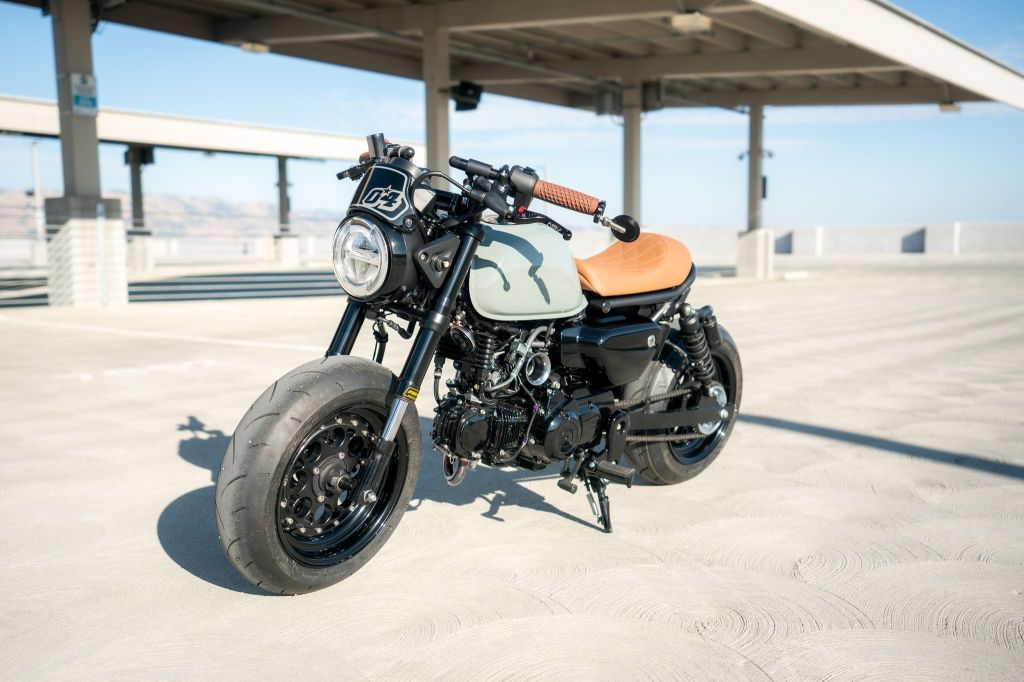
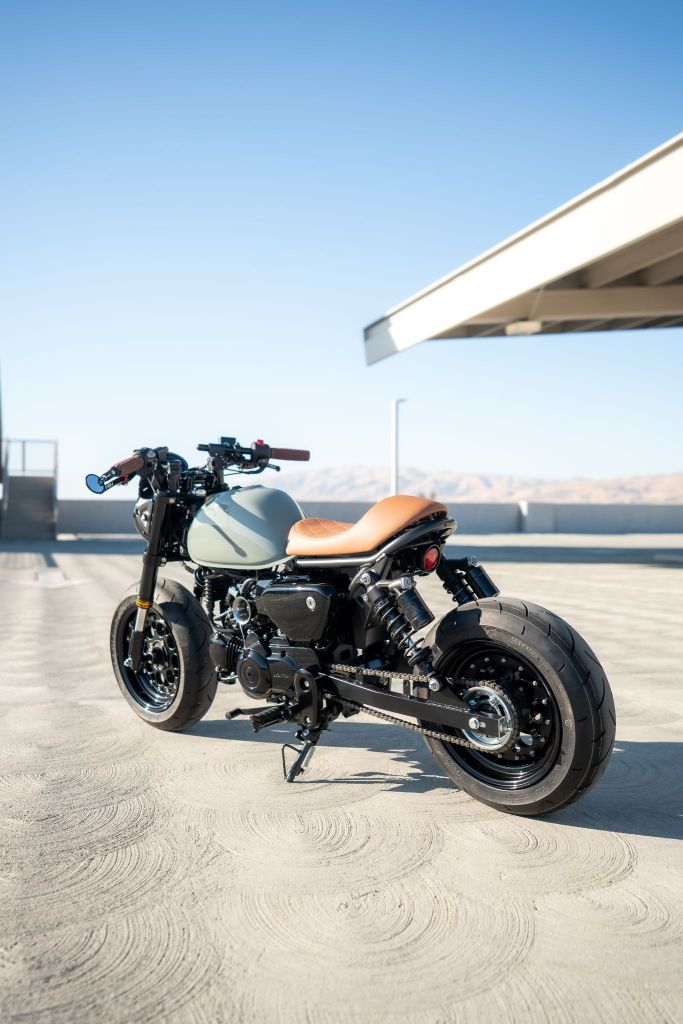
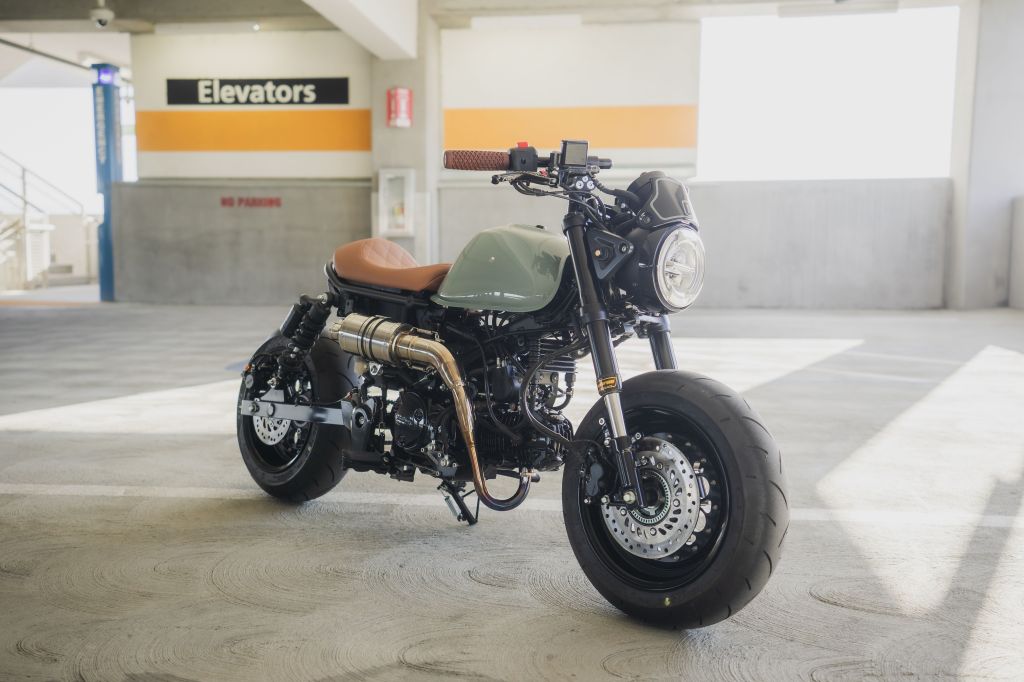
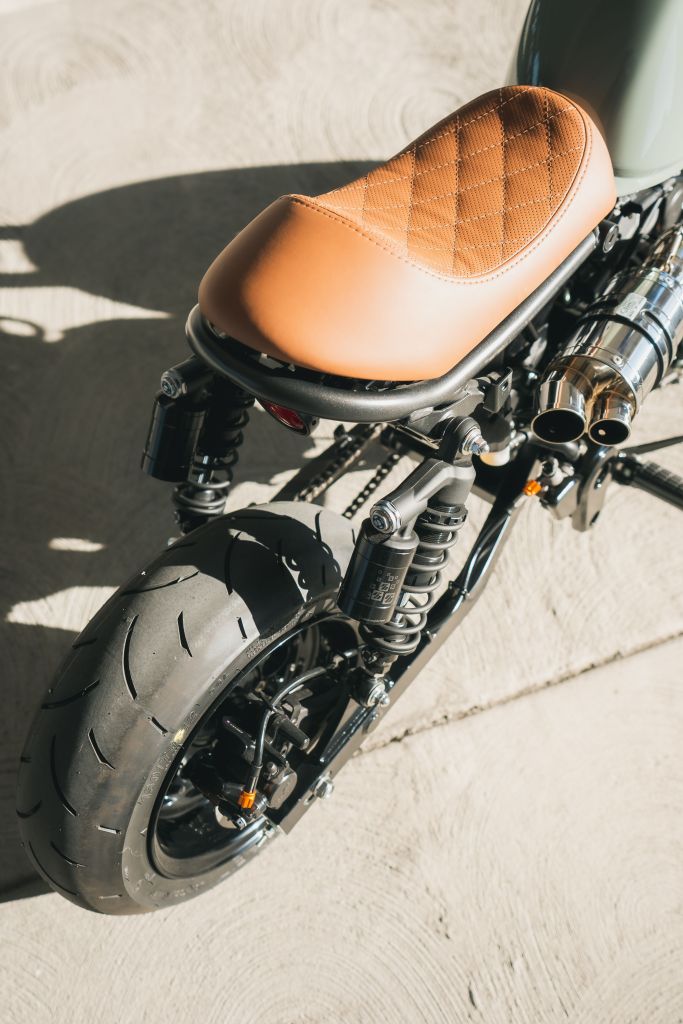
the wheels that never was

once he saw a demo bike at Fremont Honda, he knew he had to build one. they delivered it to his house and i met him and brainstormed his vision. then i took it away from him. this black and lollipop lime colorway was the scheme. transplanted a 150cc engine and went a bit further and got a 171cc bore up kit with matching cylinder head with bigger valves. a mild rev cam was also added to the mix. to fuel and spark the new setup, we opted for an auto tuning fuel injection kit. with a big velocity stack at the front. dual exit carbon fiber exhaust made all the fart noises in the rear. web design was used on the seat, not the internet. double stitched on premium vinyl. the wheels was the tricky part. we all know this person makes really good wheels, and we all know his turn around times can be long, and sometime out of his control when it comes to supply. all we ask is some for of decent communication. i don’t know how others are, but after 6 to 8 weeks of waiting, we just want some kind of update. that’s all. if there is none, just say so. just please don’t ghost us. no hard feelings, but we all have been patient and don’t deserve that. what we deserved was our friends from Steady Garage coming in clutch with wheels, cut, assembled and shipped within 2 weeks. doesn’t matter if you email them or call them, they will answer, they will respond. moving along. we hit the wheels with that darkstar powder coat! she squats with a lowered suspension and stops with Brembo front disc brake setup. we added a little sprinkle here and there to the under parts just to break up the black clump. finished her off with a tuned cvt transmission and color matched oil catch and crank breather. it’s been a journey with this one, as far as the wheels goes anyway. patience is not simply the ability to wait, it’s how we behave while we’re waiting.

turtle vs. rabbit

john found on me social and he said he was obsessed with his Metropolitan. he found another one, untouched, super clean low miles and picked it up. tuned the carb and added a intake runner and velocity stack. a full stainless exhaust as well. we ended up just lowering it, powder coating all the chrome and raw items on it. we also swapped it out to a Ruckus cvt to give it a mild stretch. but for his other one. he wanted it with a little more spice. first we ditched the 50cc engine and transplanted a 150cc engine. we then put a big bore kit with a matching head and big valves making it a 171cc power plant. added a digital fuel pulser unit and a custom made exhaust. after that we used a friends old 12×7 and 12×4 wheel set and powder coated those along with other chrome and raw bits gloss black. we custom made rear and front led turn signals and meticulously mounted them so they did not look like they were even there. the tail light was moved to the left above the side mounted license plate bracket also. we then tackled the speedometer, which we fitted inside the original speedometer housing. the biggest obstacle was to mount a new gen Metro front fender to a Ruckus steering tree. i turned to a buddy who was used Send Cut Send’s services before and we worked together to make a custom bracket. after a couple of iterations, we finally got the measurements right and after trimming the fender, we got it to fit. only problem was the new gen fender was a brighter pearl white, but i think it looks ok. maybe in the future a nice full paint job! after bleeding the front disc setup and calibrating the speedometer, test ride was great. i think it could use some cvt tuning but john said this will just be for putting around at camp sites. sure john, sure mate! *wink

keeping it 125

she got her grom for her birthday. she wanted to keep it stock. i told her i don’t do that so we compromised. keep it looking stock, but add some flair to her. that’s how she lived, stock looking but not really. we fabricated an exhaust system that kept the factory muffler cover so it looked stock, but sounded great. until one day, she started to like carbon fiber. not sure exactly why but i was all for it. new carbon fiber panels made their way in. so might as well get a new paint job for the other panels. while we’re at it, new wheels with color changing flakes was added. chartreuse accents to go with the colorway change. got the seat reupholstered with black suede with color matched double stitches. got rid of the stubby mirrors and added a bar end one. in short, she technically got new clothes and new shoes, but still keeping it 125cc, maybe!

photos by @rjsjf on instagram

one less Metruck

don’t get me wrong. Metrucks are super cool. if you dont know what a Metruck is, it is the product of combining a Metropolitan front and a Ruckus rear. i believe people do this because it is easy to do a swap on it. luckily for me, my buddy developed a mount so you can do the swap without having the Ruckus rear end. powered by a 180cc Taida top end, the starting system had to be also upgraded to a LiPo 165cca battery and a high torque starter. variator weigh tuning and a performance clutch is behind the machined cvt cover. the Ruckus swap engine harness had to be modified by lengthening the CDI, rectifier, power and ground wires to the back. the rear body panel also had to be trimmed because she is now sporting a 12×7 rear wheel. installation modification to the Hot Lap exhaust also had to be made to clear the body panel. fitted a Koso digital speedometer on the original housing and added a frame so it looks factory as fuck! oem handle bars carries after market throttle and hand controls. black suede with black double stitch diamonds . single strip led running lights with integrated brake and signals illuminate the rear end, and bar end signals for the front end. a old carbon fiber windscreen was repurposed to be a headlight hat! to keep it cute, why not a heart shaped mirror. pretty cool huh?

photos by @rjsjf on instagram

faithful to the bay

this ruckus has had an extraordinary journey. started off with lowering the seat and bars and just a few engine modifications. until one day it came to me and it had gotten in an accident. everyone is ok, but the ruckus was totaled, maybe. after going over it, it was pointless to put her back together stock, this was a perfect opportunity to give her new life! starting with a whole new 171cc power plant. paired with a 28mm carburetor, we retained the electronic pump hooked up to an after market fuel pulser unit. BBS LM replica wheels coated in candy bronze. we gave the frame a new gloss black to matte black contrast also. antique gold was added to break up all the dark and some red accents to pay homage to the Niners. the seat was shaped and shaved then reupholstered in black vinyl with double stitched diamonds. we kept the lower perimeter material of the stock seat. integrated Vapor speedometer on the handlebars with new grips. black ceracoated Yoshimura exhaust to complete that black on matte black contrast.

photos by @rjsjf on instagram

Goodie Mob

Variety is the spice of life. For her second scooter, it all started with wanting to have a little more giddy up! I installed a big bore kit along with a digital fuel injection tuner. I also upgraded the cam, variator weights and final drive gears. Before running a tune, I got a Honda Ruckus intake system with velocity stack and modified it to fit this Metropolitan. Also purchased a WirusWin exhaust system which sounds a little too tame for my taste. After that, I set out to tune her and was able to go over 50mph! Months go by and I was again handed the Met and now armed with another crazy idea. No one (that i’ve known or seen) has ever installed a mini fatty wheel to this generation Met. So, we had the rear wheel sent out to FLP and they made us a 1/1 rear hub. I used a 10×5″ solid dish wheel. I had also turned to RDR to make a minor stretch mount just to give her a little length now that she had a little girth! The next crazy part was to lower her squat. The rear end was easy, a lowered shock fit no problem. The front end however was like solving the three body problem! The steering tree on this Met was made with integrated forks, so you could not remove them. I had to take a first generation Met steering tree and marry it to her original tree. Turned to my friend at Pandora Motorsports and they knocked it out fairly quickly, as a matter of fact they thought it would be safer to press out the shaft instead of cutting and welding and I couldn’t be happier with the result! I just didn’t want to lower the front end, I wanted to match the rear wheel and convert to disc brakes. What a freaking journey just to source the 10×2.5″ wheel. Not to mention the 190mm rotor to fit the 2 pot caliper. Just spacing the wheel and the caliper was a pain. She was able to source an good condition front fender and we had it refinished by Possession Industries. Now that she sits right, I had to figure out how to fit the master cylinder on the bars which had a headlight cowling. Cut, trim, shape, that was scary. Then to complete the bars, I got rid of the analog speedometer and installed a digital one, inside the housing of the old speedometer. Did I mention the wiring conversion sucked the life out of me? Now the only thing to do was small details, like the galaxy powder coat on the wheels and velocity stack. Gloss black exhaust bracket, rear grab and bar controls, all done by Possession Industries. The last pieces was to get rid of those bunny ears mirrors and use stubby Honda Rebel mirrors. At this point she was done, no! I always do something special on every build and I figured since I commemorated someone on her Ruckus, why not on this one! This one is for you, Goodie, the goodest girl!

photos by @rjsjf on instagram

if your girl only knew

this was actually a rebuild. rudy came by and said he loved his ruckus but there was just something about it that really did not attach him to it. maybe because it was bought, not built. so he decided he would like it to be more for him (or his kid). started off with a new colorway to match his Gunship Grey Harley Davidson. a new set of 2 piece wheels but we kept the dark tan seat covers and grips. the rats nest of the old harness was yanked out for a new plug and play unit. for the power plant we ended up getting a new 150cc crankcase and building the top end with a 170cc jug and a 61mm big valve head. also threw out an old mount and replaced with a billet mount for that extra strength and rigidity. he originally had rear disc brakes but it was really a Frankenstein kit. so we upgraded to a 180mm rotor and a 4 pot caliper. instead of controlling the rear braking with the left lever. we opted to use a foot brake master cylinder instead, just like a real motorcycle would. upgraded the front brakes too to a 190mm rotor and also a 4 pot caliper. titanium hardware and steel braided lines to complete the stopping power. the lighting was the next thing to be touched and we used a Squadron XL kit for the other headlight, with its own individual switch. Lusso tail light and rear blinkers. added a digital speedometer with a custom mount to fit the handlebars he already had and also added a fuel pulset unit to control the oem fuel pump. rudy already had a pretty cool ruckus with lots of carbon goodies, just had to finish it off with a carbon frame cover. now that rudy has his ruckus all done up to his liking, rest assured he’ll drop jaws in the coming rides and shows!

photos by @rjsjf on instagram

bar find to one of a kind

the homie called me up and said his family had this Monkey they wanted to get rid of. he took it upon himself as a project and immediately dropped it off to me. rusted and hole in the frame, i said, sure lets do it. after deconstruction, i repaired the hole in the frame and sent it to get powder coated gloss black. we salvaged the old 50cc motor and transplanted a Daytona 190cc 4 speed. to keep the engine cooled, i fabricated a custom oil cooler and a custom mount hidden right behind the headlight. we opted for some classic 8 hole wheels and decided we were gonna do front and rear disc brakes. oh my God that was a project on its own. we went through 3 swing arms just to fit and center the wheels, and 2 rear hubs just to barely fit the caliper. it was eventually the Over Racing swing arm and a Honda NSR rear brake system that did the trick. not to mention 2 types of rear sprockets. the tank was painted a Toyota quicksand to match his Tacoma and seat was chopped and reupholstered to mimic the original. oem Honda Grom handle bars fit the Stage6 controls along with ASV short levers. stabilized by a gas shock stabilizer. Gojin velocity stack on the 28mm OKO carburetor and an Over Racing titanium exhaust. LED headlight and tail light was added with a backlit speedometer. this thing was a menace to build, and a handful to ride. but i wouldn’t change the experience for anything. it ended up getting attention by an online vlog and she just looks amazing.

photos by @phillihendrix on instagram

not everything is big in the lone star state

inspired by a 1986 Z50R dubbed Fur1ous9e0rge that i built. Cooper reached out to me all the way from Texas and wanted a Monkey of his own. after a phone meeting, he decided not to deal with carburetors and wanted to build a new generation monkey instead. after waiting a couple months for one, we finally took delivery. right away, we knew we wanted to go the scrambler route. he wanted everything but the tank, seat and grips in black. we chose Toyota’s Lunar Rock color for a soft yet retro vibe. we took a lowered seat with a small sport hump and reupholstered it with perforated diamond stitches along with classic Van’s waffle grips. for the handle bars we installed clip on risers to keep them low, but also to sweep them back. adjustable short levers and a folding bar end mirror to complete the hand controls. the engine was given a little more breathing power by fabricating a left side mounted velocity stack and a full stainless up exit exhaust. a performance cam was also installed along with a stand alone, wide band fuel controller. to keep the temperatures at bay, an external oil filer housing was added which came with oil cooler lines. i fabricated an oil cooler bracket with a mini oil cooler tucked in front of the throttle body. the stance of this mini was acquired with lowered front forks. the rear shocks were mounted on an extended swing arm. this was an ABS model so we had to come up with a wheel hub that will take the ABS ring and our machinist knocked it out of the park! the first ever ABS model with after market wheels! the wheels were a 2 piece set, with a classic 8 hole design wrapped in semi slick tires. a carbon fiber windscreen was added and a tank riser to level the tank with the frame. a custom tail light and rear signals was made and a custom license plate bracket to complete that chopped rear end. i had a blast blue printing this build for Cooper and it was so fun with all the over the phone meetings and discussions on ideas for it. When we finally met for the first time. I was so happy he loved it. Even though he was sent photo and video updates, there is just nothing like seeing it in person for the first time. I can confess, I cried when I delivered it. sometimes when you pour your heart into something, and it’s not even for you, your customers or clients will let you know that you did a really good job!

photos by @rjsjf on instagram

orange you glad he can cook

cooking is an art and artist know what tastes good. thats why this build blue print was super easy, plus i was hungry. chef loved the color orange. but to me, it couldn’t be just “orange”. used a Lexus UX color called Cadmium Orange, as it’s dark in nature but bright in the sun. started with a 150cc powertrain with an angle-up exit exhaust with a subtle tone. adjustable bars with a Vapor digital gauge. Orange accents were added to the fan, side decal and throttle. an led 4 way tail light functioned as the brake and signal lights and we utilized the original front signal bracket to mount the front signals, also in led. black suede seat with orange hex pattern. polished 2 piece wheels and disc brakes. we also installed kept the original electric fuel pump with an electric pulser unit.

photos by @rjsjf on instagram

Blog at WordPress.com.

Up ↑